擴充功能的設置畫面 Options Pages
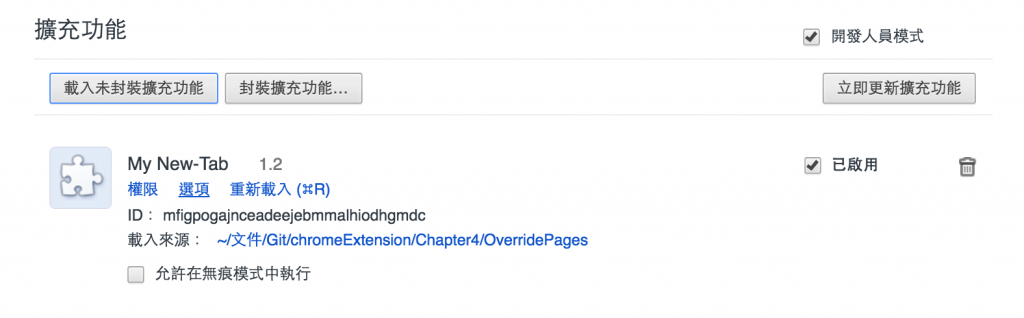
擴充功能的開發者,能籍由提供選項頁面,幫助客制化擴充功能的行為。使用者能在擴充我能管理清單(chrome://extensions)看到[ 開發者為使用者提供的自定義介面,如下圖(點擊選項即跳出設定頁面):
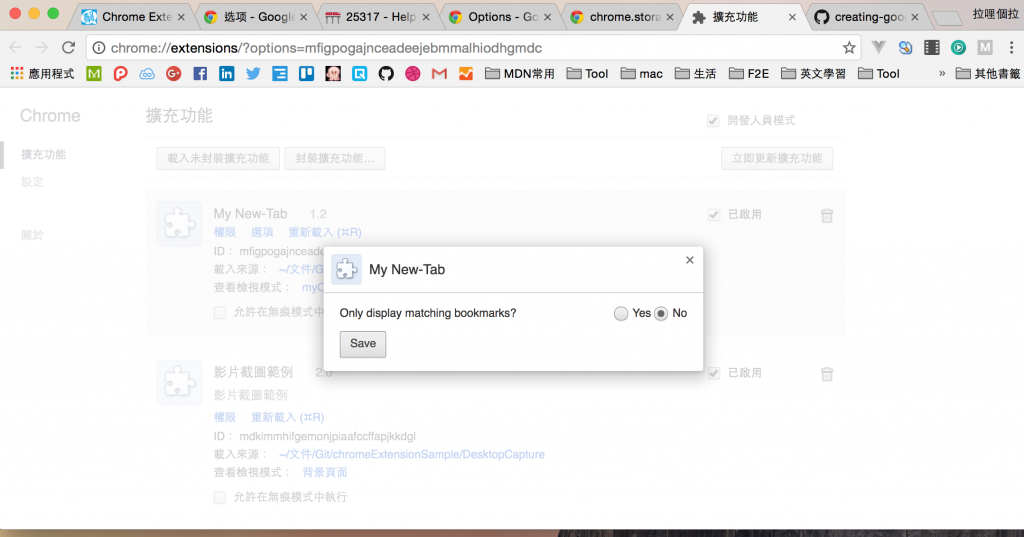
點擊選項後,使用者可以看見開發者打定義的設置頁:
設定頁面的制作,在Chrome40之後及之前存在版本差異,我們今天介紹的會是新版的作法:
關於設置的資料儲存,我們將使用到前面有提到的chrome.storage API將設置的結果儲存在地端,官方建議我們應該總是用storage.sync API來同步所有使用者登入的Chrome中的擴充功能設置。
第一步:設定檔的設置
1 2 3 4 5 6 7 8 9 10 11 12 13
| { "name": "My extension", ... "options_ui": { // 必要欄位 "page": "options.html", // 是否使用Chrome提供的樣式,官方建議設定為true, 即使用官方提供的樣式 "chrome_style": true, // 不建議設制以下屬性:是否用新頁籤的方式打開設置頁,此功能只是為了與舊版兼容,將來會棄用 //"open_in_tab": true }, ... }
|
第二步:制作你的設置頁面
1 2 3 4 5 6 7 8 9 10 11 12 13 14 15 16 17 18 19 20 21 22 23 24 25 26 27 28
| <!DOCTYPE html> <html> <head> <title>My Test Extension Options</title> <style> body: { padding: 10px; } </style> </head> <body> Favorite color: <select id="color"> <option value="red">red</option> <option value="green">green</option> <option value="blue">blue</option> <option value="yellow">yellow</option> </select> <label> <input type="checkbox" id="like"> I like colors. </label> <div id="status"></div> <button id="save">Save</button> <script src="options.js"></script> </body> </html>
|
腳本:options.js
1 2 3 4 5 6 7 8 9 10 11 12 13 14 15 16 17 18 19 20 21 22 23 24 25 26 27 28 29 30
| //將設置用chrome.storage.sync儲存 function save_options() { var color = document.getElementById('color').value; var likesColor = document.getElementById('like').checked; chrome.storage.sync.set({ favoriteColor: color, likesColor: likesColor }, function() { //提供儲存成功的提示 var status = document.getElementById('status'); status.textContent = 'Options saved.'; setTimeout(function() { status.textContent = ''; }, 750); }); } // 將設定調整為預設值的功能 function restore_options() { //利用get設定預設值並,無值即取得預設置,有值則使用之前儲存的值 chrome.storage.sync.get({ favoriteColor: 'red', likesColor: true }, function(items) { document.getElementById('color').value = items.favoriteColor; document.getElementById('like').checked = items.likesColor; }); } document.addEventListener('DOMContentLoaded', restore_options); document.getElementById('save').addEventListener('click', save_options);
|
注意事項
選項頁被嵌入在擴充功能的管理界面裡,它不是一個獨立的頁籤,所在在使用上,跟前面介紹的有關擴充功能的視圖,在行為上有微妙的差別。
連結到選項頁面
- 建議的作法:Chrome42後提供 chrome.runtime.openOptionsPage( )讓你可以直接使用腳本打開頁面。
- 不建議的作法之一:使用連結 chrome-extension://yourextensionid/youroptionspage.html直接打開設置頁面。
- 不建議的作法之二:使用 chrome://extensions?options=yourextensionid打開設置頁,因為這個路徑可能會因為版本而變動。
使用腳本打開設置畫面的範例
1
| <button id="go-to-options">Go to options</button>
|
1 2 3 4 5 6 7
| document.querySelector('#go-to-options').addEventListener(function() { if (chrome.runtime.openOptionsPage) { // New way to open options pages, if supported (Chrome 42+). chrome.runtime.openOptionsPage(); } else { // Reasonable fallback. window.open(chrome.runtime.getURL('options.html')); } });
|
關於Tabs API
由於設置頁面並不是一個獨立的視窗/頁籤,所以他可能會造成以下影響:
一般來說你也不太需要在選項頁面使用這些功能。
關於Messaging APIs
如果非得跟選項頁溝通的話,你能使用runtime.connect以及 runtime.sendMessage 來替代他,因為選項頁面也在擴充功能的執行階段底下。當你跟選項頁腳本溝通時 Sender’s URL會是選項頁的page URL。
選項的視窗大小
選頁的視窗大小會自動根據選項頁的(html)內容寬度自己決定。當你發現畫面嚴重跑版時,可能是因為你將寬度的布局基於了視窗大小,解決方法是為你的寬度加上最小值。